| Squire and Countess class extensive guide: NM Survivals |
By Czokalapik | Version:1.0.0 |
|
|
Patch accordition |
|---|
| 7.18b |
|
Changes for Djin handling will soon be added.
General preferences and personal tips[]
Many times i've tried Nightmare survivals before getting equipment better than 1500 tower damage and many times i've failed. But sometimes even lower stats will let you farm pets (wave 14) or even further, you just have to try, modify layout and strengthen weak points.
I won't ever tell you in this guide what stats you should have for simple reason: i don't know, can't remember. You'll have to test layouts to know it yourself. One thing i can tell you is that i wouldn't recommend you going on NM survivals with Tower damage lower than 1500 if you plan to do more than farm pets.
There are few things about Survivals i'd like to share with you:
- Unfortunately Squire can't handle spiders like App can - by placing lots of towers in central defense. Squire's harpoons take too long to target spider, only cannons can deal with them when on flat terrain (or facing downhill), so in most cases you will have to build Bouncers/traps+MB only for spider defense.
- You won't see Healing Aura in my survival layouts, one exception is Über (Lifestram Hollow) Monster Fest, but it's not really survival, is it? Why? Because too much AFKing on NM surv = wipe, no matter how good your equipment is. You could afk on Insane or lower, on NM you would need HUGE tower dmg output and ninja/spider handling to be sure that absolutely nothing will hit you, or your defenses to go AFK.
- Pet rewards do not change with Hardcore Mode or Mixed Mode enabled, not normal pet rewards nor Giraffes. (need confirmation on that info!)
- In Mixed Mode handling wyverns can be easier as they are also spawning from regular mobs spawn points (less wyverns per spot, but more spots overall), so they can be killed by regular defenses. On the other hand it can be harder, when for example harpoons are focusing mobs closer than wyvs, and dragon or two will be able to slip through defenses.
Anyway - MM layouts should have more spread anti-air. - In maps swarming with wyverns i found Darkness Trap + Ensnare Aura to be great combo preventing late-wave fails (even with 6 DU usage). That's because most of the times poison resistant wyverns at the end of the wave are the biggest problem. When flying from all directions, or even specific one but as huge group, sometimes poison immune wyvern can slip between harpoons arrows. Yes, traps work like auras (also above them in radius same as trap radius), so wyverns above them are also affected.
- Apart of Wyverns you have to guard your defenses from spiders, when you don't have good spider def you will fail for sure.
- One more important thing is that after 7.17b and 7.17e Mixed Mode item quality buffs on Nightmare, not only Mistymire Forest will drop decent gear, but earlier maps also. It's either that, or common supposition that better equipment you have - better drops you will have.
- Having second Squire/Countess or Series EV with very high Tower Health is almost mandatory in later waves (15+ or 20+ depending on map) of every survival. Sometimes Blockades are safe, not damaged often, then you could say it's not required, but it's still is - switch your Thp equip to App and build Magic Blockades instead of Spikes, you will save some DU then.
- I'll show you layouts with Tower Buff Beams, but remember that if you don't have good Series EV you can use guardians to "simulate" TBB (like buffing aura radius with stationary Monk Guard).
Most layouts used by me require some additional classes (i have leveled some alts and equipped them with my old sets and pets). This game depends heavily on every class available, so i'd strongly recommend having such alts or having group of friends with them.
I have found Trap huntress and Series EV most valuable alt for me. Because my regular usage of Traps and Beams you could even say it should be Huntress or Series EV guide, not Squire, but i'll respond to that wiith this: Can you do Nightmare map with only Traps? Can you add 3-4 App or Squire towers to your traps and do Survival? No, it's the other way around. Monks, SEVs and Hunts are only addition to Main Builders (App/Squire).
What characters i had while writing this guide:
- Countess Builder with very high Tower damage (~2500), Tower rate about half of Tdmg, Thp and Trange even lower (600-1000)
- Series EV Tower Health and some Tdmg - maxed out Thp for high HP Physical Walls and about 1000-1500 Tdmg (in some layouts i also used Squire with Maxed out Thp)
- Trap Huntress - High Tower Damage (~2500), decent Tower Health (~1500), lower Tower rate (~1000) and some (~400-500) Tower range.
- Adept for Lightning tower with high Tdmg (~2500) and Trange (~2000)
- App for Thp Magic Blockades - maxed out Thp
- Aura monk with very high Thp (~2500), high Trange (~2000) and decent Tdmg ~(1000) (also Electric Aura monkress with ~2500 Tdmg and ~2000 Thp)
- DPS Barbarian
Deeper Well[]
First map you will ever see, very easy one, but don't be fooled! Without wyverns, Ogres spamming from spawn points are very dangerous here.
AFK duo layout Mixed Mode[]
This layout is very slow due to jamming mobs on gas traps, but it's almost fully wipe-proof because you will be slowing everything thanks to Darkness + Ensnare combo, jamming stairs with gas traps so only part of ogres and ninjas will get through at once, and cannonballs will crush everything in the middle of the hallways without letting anything to walk up to Spikes.
One requirement for this layout is at least Hunt guardian, but i strongly recommend having two players, one with App, one with Hunt guardian, both buffing all Cannons.
Hunt guard is required because more cannonballs will be rolling around and that is needed to kill spiders hitting two Magic Barriers (when spider will fall on MB it will hit it, not other towers).
Also check very carefully if you can slip through Spikes, if you will, ogres will also, so make sure you can't.
Two back cannonballs are placed there to kill spiders spawning near them, also they are turned little to south-west so they will shoot only in outer hallways.
For more offensive power you can change Gas Traps to Proximity mines for example. But there is possibility that ogres and ninjas will be able to damage Spikes.
Deeper Well NM Survival for duo
If you feel comfortable about your towers you can risk by removing darkness and gas traps and adding harpoons for each side (but don't point haproons at Magic Blockades so they will focus on mobs at Spikes, random cannonballs will take care of spiders at MBs).
Foundres and Forges[]
This map can be done in few ways: focusing on spawn points, focusing on stairs, focusing on 3 lanes at crystal. While Focusing on spawn points was good for lower diffuculties it's not best idea for Nightmare. Also when you will choose to build up your defenses at crystal you can use ony 3 Spikes, it's strange that ogres won't go by them, but they won't.
Solo Mixed Mode[]
Foundries and Forges NM survival
Whit this layout you will have 4 DU left, so you can use healing aura for example. If your trap hunt have low Thp (fully upped proxi with less than ~250 charges), you can switch Proximity Mines to Inferno Traps and move them a little away from crystal, so they will also dmg mobs on bottom (with Darkness Trap they will damage everything).
Personally i prefer Inferno version, there is much higher damage output, but for Inferno to also nicely damage mobs at spawn point, not only on top i'm moving Ensnares away from crystal, so they also slow mobs at bottom. But this will eat up Ensnares HP much faster than proxi's charges. Surely it will be effective, but you'll need to run and repair whole the time.
It's your call, i gave you pretty safe layout, but i personally prefer one with inferno, something like that
And again - Hunt guardian buffing Cannons will help a lot here, not only for dps increase, but also for killing lesser mobs (spiders included) faster.
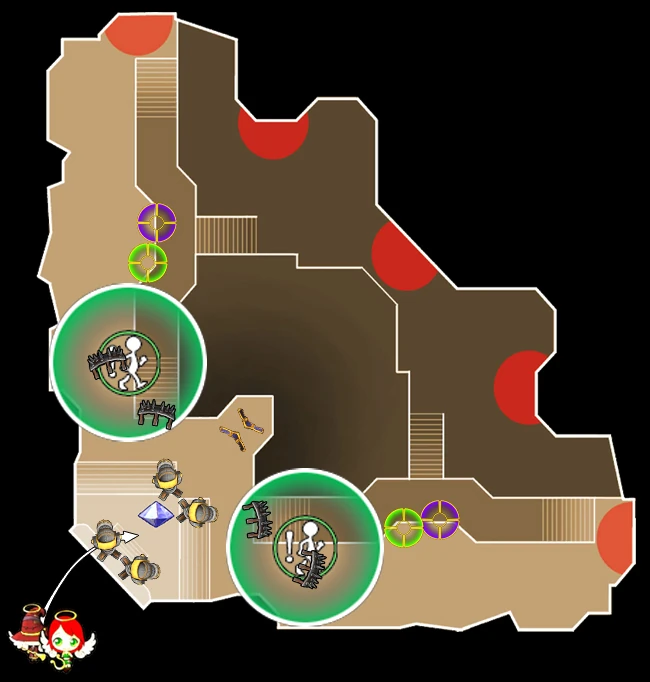
Magus Quarters[]
So Magus Quarter, while still with crappy drop like on most of maps, it call for most players. Simple map, simple spawns, hard not to try. But what i've learned - there are no simple maps, and that one in particular can have more wyverns than any other.
Lower Quality equip needed, group of guardians required (non-Mix)[]
First i'll show you build i did when i had about 1500 Tower stats, pro of it is it can get you to reasonable wave without "Über" gear, but there is a con - 3 or 4 guardians are needed.


Nightmare Survival layout for Magus Quarters for 3 or 4 players.
Whole point in this layout is wise usage of some towers (with wise buffing), most important being:
- Buffed Ensnare aura by monk guardian covering whole map. You'll need about 11 aura radius on Nightmare and decent ~30-40 Monk guardian for aura to be effective enough.
- Buffed Lightning tower by both, Monk and App guardian - this is wyvern killer, this is what will be taking out LOTS of mobs. Remember that Player with App guardian can be mobile, as only late wave (when spiders and wyverns come) needs Lightning dmg buff. At start and middle of each wave it will be better to buff Cannons and 2+ harpoons with App for ogres faster killing.
And the rest:
- Spike blockade on the middle of the stair because when its on top or bottom of stair ogres will shoot ogre balls in defenses, and with Blockade on the middle, most ogre balls will fly to the sky or somewhere not-near defenses. (you can use Magic Blockades on the sides if you have Decent Tower HP App).
- 3 harpoons on each side, one on middle, one facing bottom, one facing more side, but all having wyverns as priority. That's 6 harpoons targeting different wyverns. But remember that in this layout Poison immune wyvern will cause fail if not killed.
- 3 Cannons, each on one stairs. I always try to rotate side Cannons a little to the north, so they won't shoot so many cannonballs into lava (there's no rescue for middle cannon, but well, it is there for Ogres). After few waves you'll see huge kill counts on side cannons.
- There are also 2 Fireballs in front, well, i had decent app, worse than my countess, but decent, putting 2 fireballs there even if i was active with my Countess builder was great idea because buffed by monk guardian, and later by app guardian also were killers reaching to every corner of the map.
With this lay i'm starting by building 3 Bouncers on each stairs lane, and then slowly cannons (during wave) and north anti-spider bouncer, harpoons, then i'm changing bouncers on stairs to spikes. This layout is pretty simple, i think you can even farm pet solo, with only monk guardian, but i don't think you'll get anywhere further by yourself.
Wyvern-safer layout, less players, but better gear required (non-Mix)[]
That's one of my most recent layouts using newly discovered Trap Huntress potential.


Magus Quarters NM survival for solo+
There's nothing much to say here, same rules as in layout above, but some basics changed:
- only side cannons as front one wasted too many cannonballs by shooting in lava
- more ensnares so handling everything will be easier.
- to be sure that not even one wyvern will fly through Ensnare - Darkness Traps.
- Instead of Lightning Tower and Fireballs i used Proximities. Thankfully when wyverns start to fly also spiders will spawn triggering both Proximity and Darkness Traps.
- Magic Blockades on sides instead of Spikes, there is much less pressure on those sides, but you have to watch out for ninjas and kobolds, if MB isn't enough, then switch to Spikes and instead of bottom bouncer+2 harpoons put cannon and for example Fireball.
This layout won't let wyverns through, but sides will be weakened, and in later waves proximity mines may need buffing by App guards if your Trap Huntress is weak.
Wyvern-safe Mix Mode[]


Magus Quarter NM MM wyver-safe layout
This one is created for Mix Mode to be sure that no wyvern will fly untargetted, it have very low offensive power, so good gear is required. You now know the basics, why one tower there and not elswhere, so i won't be getting in details about this layout.
Alternative layouts for Mix Mode[]
Layout above is solo/duo lay, defensive one, if you can play with someone with monk guardian - try to use one ensnare, like on first image, for example layout like this for jamming most dangerous spawn, or this for more offensive power, or even very similar to firstlayout with Lightning tower if you have good App by now.
Or if you have one or two DPS friends with good map awareness you can get rid of Darnkness Traps on the stairs, so they will be responsible for Poison-immune wyverns.
One of Layouts i've tried for MM when playing with 4 players was this, with Monk guardian on Ensnare aura at all times. Experiment yourself.
Alchemical Laboratory[]
While still i find App to be better for this map (even with Spike Blockades) i've tried to make good Squire layout and i think i've managed it well.
Mix Mode solo or more[]

Alchemical Laboratory NM MM survival
On the image above you can see more transparent versions of traps and auras, this indicates how they should look in game, how much radius you should have on them. It's very important, so auras can reach 2 stairs at once and left traps can reach spider spawn point both, at harpoons, and at Magic Blockade. Spider handling for Squire here is much harder than in Apprentice's case because this map is perfect for App, centered def, choke points close to each other. But still with Huntress Trap it's doable.
Now some explenations to this layout:
- Harpoons at Proximity Traps are facing the stairs so they won't start turning when spider shows somewhere around. In this way Spiders drop almost perfectly in front of them, so harpoons won't wase so much time to return from spider to stairs.
- Right Spikes should be little skewed do ogre won't jump from the stairs.
- Inferno trap is there for damaging lesser mobs, alternatively you can use Gas Trap when you feel too much pressure on right Spikes, or Proximity if Kobolds are able to get to Spikes (Proximity will almost always one-hit Kobold, but in this case Darkness Trap can also do the job, so all Kobolds will be slowed by Ensnare).
I've tried lots of Spider handling layouts there, cannons, bouncers, but this one is for now the best, while middle Spiders are taken care of by Proxi, top and bottom Spider spawns are covered by cannons. You can try Bouncers instead of cannons and add harpoon on the middle, but i found that this number of buffed harpoons are enough, and cannons will shoot some mobs at spawn points. But care, both cannons and harpoons have to be placed on second/third stair from top, because when you'll build them higher ogres and spiders will have them in its range.
This build doesn't require more guardians (surely duo of app and hunt guard buffing harpoons will be helpful), but it requires lots of repairing, proximity mines and Str Drain auras are loosing HP quick.
Servants Quarters[]

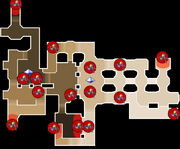
Most dangerous spiders spawn points.
This map is like maze, it's crazy, and there are lots of spiders spawn points, undoable one would say. But there is one thing that makes is doable: Ogres have 10x less HP than normal. Every mob is dying like crazy here. And in my opinion this map can be easiest on all survivals. One big problem is...only 85 DU for so many choke points and spider spawns.
I was planning on showing you 2 or 3 layouts, but one involved Proximity Mine for almost every spider spawn point required just way to many repairs, second was without spider-specific defensebut it just couldn't handle so many spiders.
So i've decided to show you only one layout. I made it to reasonable wave with it.
Solo+ Mixed Mode[]
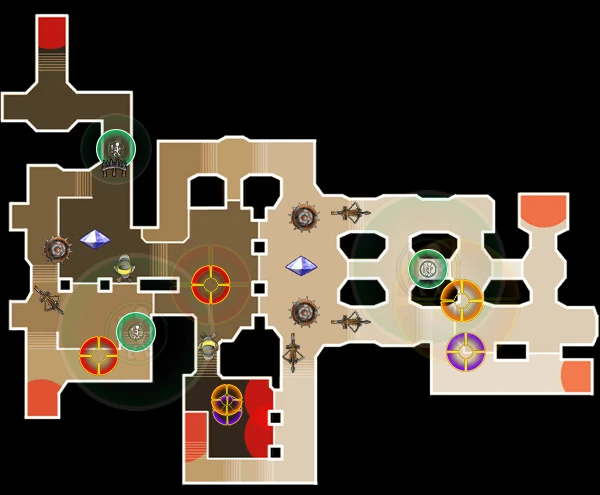
Servants Quarters NM MM survival layout
Again - more transparent versions of auras and traps show you how they should look in game (for middle proximity this indicated Trigger Circle, not effective range).
Due to so weak monsters, after lots of tries (also with Magic Blockades) i decided not to use Spikes where it's notnecessary, ant this layout is my final outcome.
Most of it is self-explanatory, but i have some pointers for some of towers:
- Harpoon bottom-most of right crystal have to be built at bottom of stairs and moved a little to western wall, i don't know why, but when i built it more on center, spiders slowed it much more often.
- Ensnare on right will require most repairs as it will cover mobs for longer time than rest of ensnares
- You will have to reduce size of bottom Inferno and Darkness Traps so they can be built between spawn points.
- Northwestern Ensnare should have it's size reduced, so it won't slow anything before the turn - it would be waste of its health if it did.
- Southwestern Proximity should be built as close to spawn point as possible, because some archers and goblins can go straight north.
This layout has proven to handle this map to at least wave 15 without much problems (i got further, but got bored before wave 20). Most of the times waves ended without much damage done to towers placed instead of Spike Blockades. Only problematic mobs were Ninjas at right crystal when i was around therem they were jumping over harpoons on me, but thanks to bouncers there i had many options to kill them just by positioning myself near Bouncers.
I don't recommend using Hunt guardian here, App is much better because corridors here are small and you don't need more shots, only more damage. Also with Hunt guardian Proximity Mines would require much more repairs.
Hall of Court[]
This map is tricky, because archers can damage left core from left, or (what is worse and happens more often) from top and bottom, near spawn points. Without good offenses pointed there or traps, archers will one-hit core in later waves.
I haven't got to last wave on this map, never tried much to be honest. I was just farming genies here starting from wave 8, so if someone have ideas if layout below will be good later, or have ideas how to change it - leave a comment.
Genie farming and more, non-Mix[]

Hall of Court non-Mix nightmare survival layout.
Proximity Mines near spawn points prevent archers to shoot in core, first vesion of this layout was with two ensnares on left, both slowing mobs near spawns, but i found good Trap Huntress's Proxis to be enough to handle unexpected core damage.
Another cause of wipes were wyverns with immunity to poison, that's why there are Darkness Traps, those have proven to work perfectly.
And one more important thing is Spikes placement - those should be placed not totally in front, but a little back, so every ogre will have to walk close to them to attack. Spikes placed too much in front will cause ogres attack them from under the core, damaging core, and spikes placed too far back will cause ogres to walk too close from sides and also attack core.
If you want to start at wave 8 i recommend you taking trap hunt and build proximity mines: two left, near spawns (like on map), two for spiders in middle, one or two on right.
Then switch to Squire builder with genie and start building defenses. Harpoons first, then defensive spikes and bouncers, then, when most choke points is guarded, you can add rest, whatever you like. After wave rebuild everything, then you can start upgrading.
Starting from wave 8 here is really hard here, if you can't manage it, go for wave 6 or lower.
Some things you should know are Bouncers on the right taking great deal of damage from ogres in later waves, those are there both as blockades and as anti-spider defenses. You can change it to spikes (higher on the stairs) and one MB on each side for spiders to attack.
Also on right you can switch 3 Magic Blockades to Proximity, this will improve wyverns killing, but some spiders might throw web on harpoons then, and this wll mean fail in later waves.
Mistymire Forest[]
Best loot before 7.20 patch, lowest number of mobs per wave, different pattern than other maps have of mobs spawning (without so many Wyverns, and wyvs flying in bigger numbers only at start of the wave), but high HP and high DMG monsters, Spiders hard to handle (can't be one-hitted in later waves), Ninjas destroing Spikes in no-time, Ogres with 20mln+ HP on later waves.
I have tried so many layouts, first ones was with 3-4 spikes for each choke point, just for backup, later there was more Trap Hunt usage, less Monk usage, and finally i came to some reasonable waves. Good thing in Misty is that when you will block spawn points you can easily farm mana with genie and starting from wave 8 you can have most of your defenses fully upgraded in wave 10.
Mix and non-Mix Duo+ layout[]
After some time experimenting i saw on Trendy Forums great build Kandar, similar to mine from that time, and after some changes and modifications i came with final outcome for this map that i use to farm to wave 30.
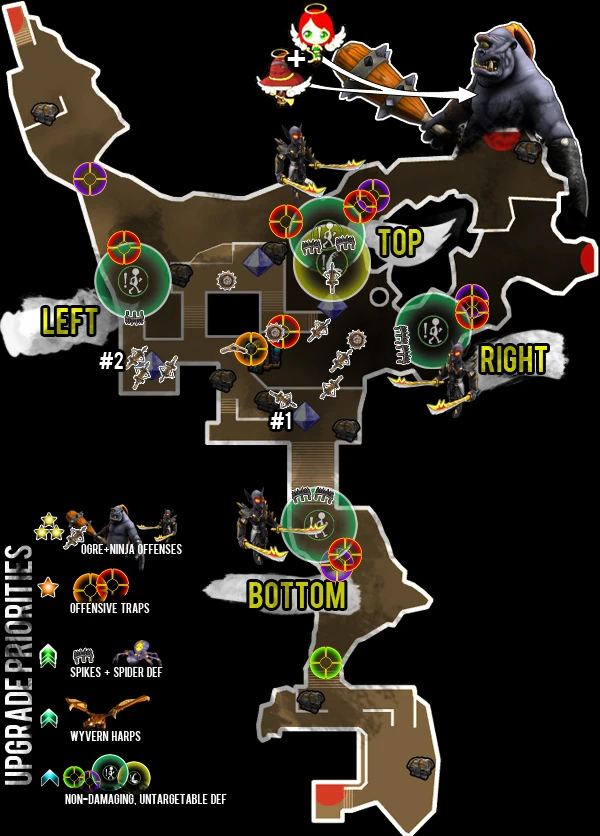
Mistymire Forest Survival NM HC MM layout for duo+
I know it looks chaotic, but this map is like it is, and it's hard to show layout when there are chests or cores everywhere and paths are so thin and there is so many of them.
First explanation of layout above:
- LEFT, TOP, RIGHT, BOTTOM, are names of choke points that i will use here
- #1 is for harpoon there. I marked it, because you can place harpoon in this spot (on higher level for better effect) rotated to right choke point, so it will shoot monster from bottom, and if there are none there, it will fire to the right choke point (without targeting any wyverns, it's not necessary as one harpoon for one wyvern spawn is enough in this map).
- #2 is also for harpoon, it's rotated to the right, so it can help in killing spiders from magic blockade
- Harpoon for wyverns at left crystal is hidden, in Kandars layut it's placed more on north, but sometimes spiders slowed it, and i changed it's placement
- You see 3 ninjas on the map, this indicates where they can do most damage to your spikes
- You will also see big ogre on the right, it's there because top and then right choke points will always have most ogres to handle - remember that.
- As you can see there is App+Hunt guard with arrow pointing at ogre, yes, that means you have to boost harpoons where ogres are at the walls, prioritizing center crystal, then bottom, then left one.
- Bouncer for Spiders placed on Proximity mine should be placed at the edge, so no spider will drop off higher level and loose aggro to bouncer.
- Magic Blockade for spiders (on Inferno) should be placed under spiders dropping point, so they will drop on MB and attack it, sometimes it's not enough when MB is around, it have to be under spiders spawn point fro them to attack it.
- In general spider defenses are different than in Kandar's original build because i had problems only with spiders from one point (where Bouncer+Proxi is), i have tried using some alternative anti-spiders def, traps, bouncers, non worked that well as the one on the image (but care for top bouncer, it can get some serious dame at the end of later waves.
- Placing two spikes at top choke point can be tricky, as placed wrong (so they block path between the trees compleately) will cause ogres to treat them as terrain and they will try to jump over it, rotated in wrong direction will cause the same. It's hard to say how you should do this, so Kandar showed it on screens.
- Also i've added on image upgrading priorities for this map, first being harpoons (non-wyvern ones), then offensive traps, almost along with Spikes and spider defenses, then wyvern def (i'm upgrading left harpoon for wyvs to first or second level just before wave 10), and then rest of non-damaging defenses (Str Drain being most important.
I have no idea what more to tell about this layout, upgrades, really good map awareness and repairing spikes, and of course buffing harps to shoot down ogres as fast as possible.
You will just have to try it yourself, modify when needed and fail, fail, fail, fail like most players did when doing this.
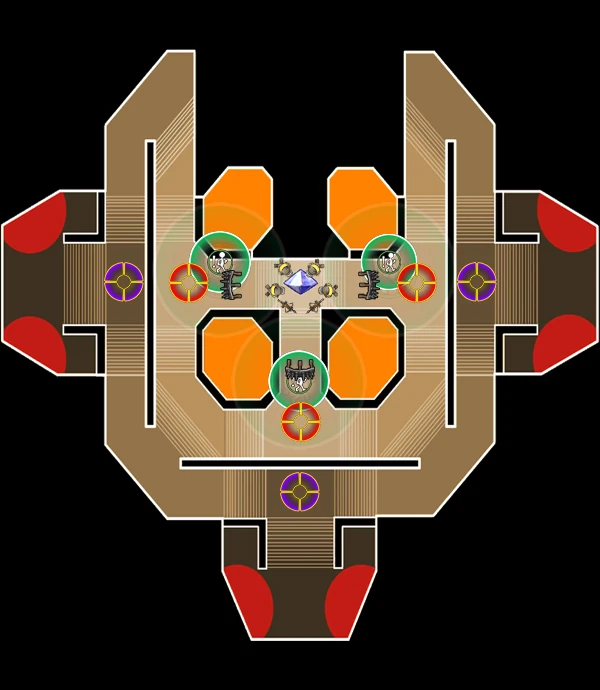
Über Lifestram Hollow Monster Fest[]
Über Lifestream Hollow Monster Fest (umf2) isn't survival, but items dropped and rewards quality, as well as more waves than usual map/challenge can almost qualify it as survival. Remember that when playing in at least duo, chances for pet reward will increase (or at least most of players say so).
This map is pretty easy and there are lots of layouts for it, each involving different defenses positioning, different classes as main builder, but well, this build works perfectly for me, both with PUG (Pick Up Group, Random Platers), and solo/duo.
Working solo/duo layout with modifications for bigger group[]

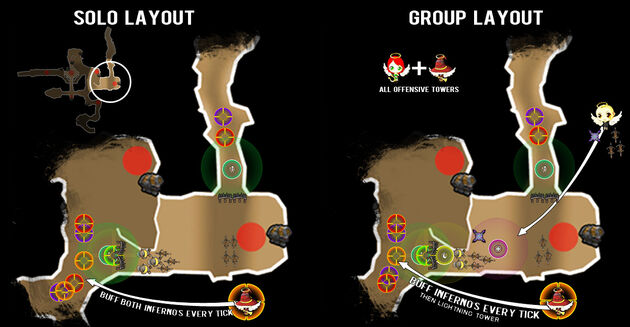
UMF2 layout based on my friend's (Troll Brokexport) idea.
Some pointers for start:
- More transparent versions of auras and gas trap indicate how they should look in game.
- Ogres should be aggroe'd to towers, so they will almost never attack Spikes.
- Str Drain aura (for group layout) isn't required due to above, but it's a backup and it should be built to drain mobs only close to blockades (ninjas/ogres) and some inner defenses when ninja will jump in (which never happened to me),
- Gas trap on left should reach furthest to center of Inferno radius with its effective range, it would be waste when stunned mobs aren't damaged by Inferno.
- You can build more traps somewhere on mob's paths on the left instead of cannon / harpoon or two, so less mobs will reach main defenses, but then again, it requires running around and repairing between the waves (proxis have to be repaired DURING last waves if they have ~350 or less charges) so in my opinion it's not necessary.
- Lightning tower not boosted by Monk and App guardians is waste of DU here (and on most of survivals), so i don't recommend it for solo/duo.
First of all you should build squire defenses, then after first wave - traps, and after second wave - auras (and lightning towers for group layout). For first 2-3 waves you should use genie for upgrading your offenses to ![]() (only offensive towers), upgrade Spikes and other non-damaging auras/traps only when they will loose too much HP or charges. After those initial upgrades genie will no longer be required as ogres, orcs and ninjas will drop lots of mana for upgrading, you can now upgrade rest of defenses, and of course all to
(only offensive towers), upgrade Spikes and other non-damaging auras/traps only when they will loose too much HP or charges. After those initial upgrades genie will no longer be required as ogres, orcs and ninjas will drop lots of mana for upgrading, you can now upgrade rest of defenses, and of course all to ![]() .
.
There are some patterns i follow for this map, but they are not required, those will only speed things up. First of all i always play with App guard when soloing this, and i always boost Inferno's every tick (Inferno needs buffing only when it's firing off, after that damage will be boosted for whole duraton even when app guard isn't in range).
As for group layout, monk position is important because apart of buffing Lightning tower, player with Monk guard should also be buffing at least two harpoons on right. Path in front of right harpoons is almost straight, so when buffed by Monk Guard, harpoons will shoot most mobs before they will walk up to Proxi or any other def.
Other players in group layout should buff cannons and harpoons with App and Hunt Guards. It would be perfect if one meele player with App guard could circle somewhere near Inferno Trap for boosting it's and Proximity Mines damage (hunt guardian would be bad idea in front, proxis would require much more repairing, and inferno dps wouldn't be boosted that much).